Survey String Manager
Icon: |
Introduction
The Survey String Manager form provides numerous tools for the user to edit points and Survey Stringwork, to exactly represent the intent of their survey.
Survey Strings are created by connecting COGO Points based on their point Descriptions (a Code identifying the type
of point and a 'Survey String' number form a unique combination for connecting
with Survey Stringwork). Initially, linework is connected in
ascending point number - this can be modified in the Survey String Manager
form as required.
Note: when Survey Strings are reorded they connect to points in a different
point number sequence - COGO Point numbers are not changed.
The Survey Line Settings lists the Codes that should be connected with linework.
Survey String Manager - Display
A view of the Survey String Manager is shown, below.
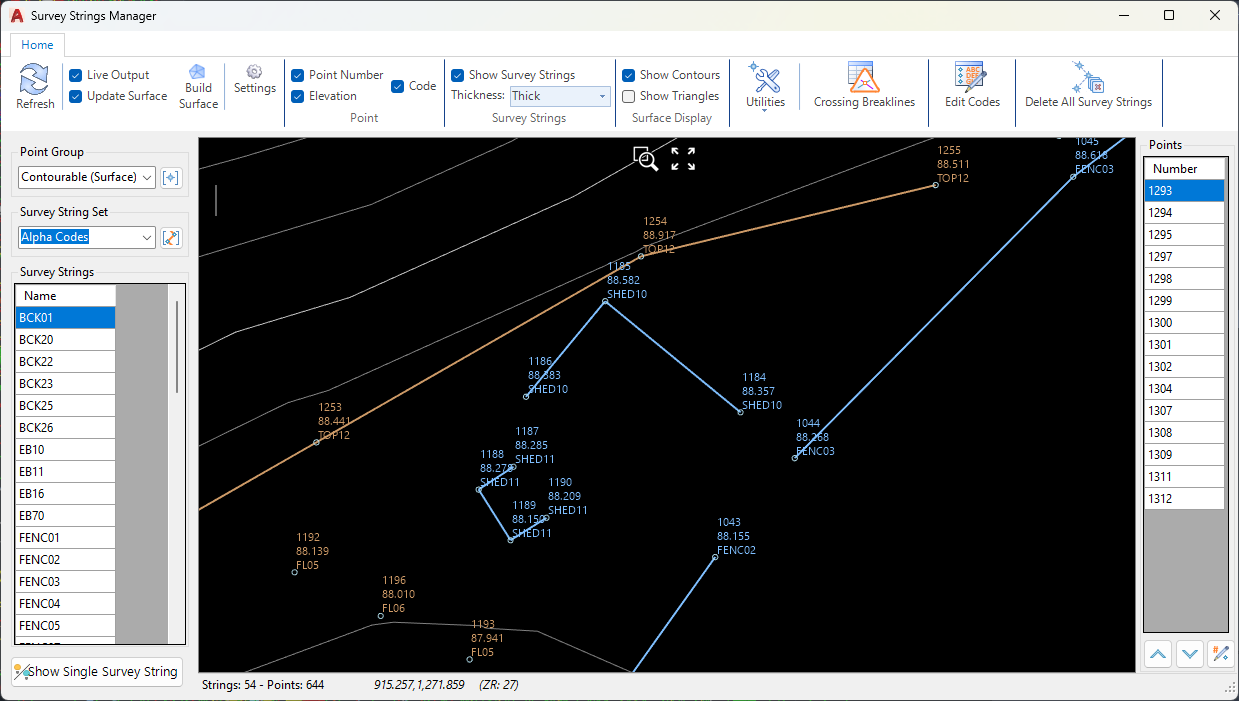
The main components of the Survey String Manager form is as follows:
Ribbon Area (Top)
Users can start commands from here and configure the display of data in the form. The ribbon is split into different panels covering core commands, String (Survey String) edits and Point edits
Graphical Display Area (mid)
Displays all COGO Points for the selected Point Group (left) and Survey Stringwork connecting the points
Navigation
Hold down the middle mouse button to pan
Roll the middle mouse button to zoom
Click
 to zoom extents
Click
 to zoom to a window. Left click and drag to create
the zoom window
to zoom to a window. Left click and drag to create
the zoom windowLeft click to select a COGO Point or Survey String for editing (colour will change to orange). Right click to display edit controls for the selected object.
Left click on any COGO Point to highlight the point for editing (colour will change to orange). Right click to enable a command menu for applying edits
See further below under Point Edits.Left click on any Survey String to highlight the line for editing (colour will change to orange).
When a Survey String is selected, a Start and End badge will display to identify the direction of the Survey String. Pressing [esc] or re-selecting the Survey String will stop these badges from displaying for the selected Survey String.
Right click to enable a command menu for applying edits
See further below under Survey String Edits.COGO Point text information can be changed - size and display of code, elevation and number can be turned on/off
String colour comes from the selected Survey String Table (String Set Table). Left clicking on a line will make it display orange (highlighted). String display can be switched on/off and line thickness changed.
When a Point or String edit is started and requires user input, a 'command prompt' will display in the graphics area surrounded by a frame

String navigation panel (left)
Here users can select the Point Group containing the points to display and also the String Set Table (Survey String Table) controlling how the points are connected with Survey Strings. The point group and Survey String Table can be edited from here
Displays a list of all the Strings (Survey Strings). Left click on a String to select it for isolation (hiding other strings) or for right click editing
Survey Strings that intersect (self intersect or intersect other Survey Strings) will highlight light blue. When a String is selected and has intersections, a marker will display at each intersection point on the string
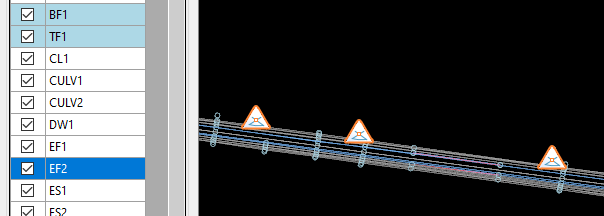
 Intersections with a different Survey String
 Self intersections (intersects with itself)
The Show Single String button at the bottom is a toggle to isolate the selected Survey String or show all Survey Strings.
String Point Connection list (right)
When a String is selected, the Points list on the right displays all the COGO Point connections (by point number)
Up/Down arrows at the bottom enables manual adjustments to the connection order of the Survey Strings for a Code
Set Start Point Number at the bottom enables the starting point number to be changed, with the other point numbers incrementing along the string
Note: Duplicate Point Numbers are allowed.
Information Display area (bottom)
When a String is selected, see the number of points, lengths and intersections of the survey lines (self intersecting or with other Survey Strings)
See the coordinates of the nearest COGO Point or the Survey String, as the mouse is moved in the graphical display
This form is resizable. As edits are made they can be transferred immediately back to the drawing (by clicking Refresh or ticking on Live Output in the Home tab).
Use the ![]() Refresh
button to synchronise information (back to the drawing) where required.
Refresh
button to synchronise information (back to the drawing) where required.
Note: If changes are made to COGO Points in the drawing, it is recommended to close the Survey Lines Manager form and restart it.
Details
Upon selecting the command the following form is displayed:
|
||||||||||||||||||||||||||||||||||||||||||||||||||||||||||||||||||||
Left Side Panel |
Manage the point group, Survey String table and strings
|
|||||||||||||||||||||||||||||||||||||||||||||||||||||||||||||||||||
Point Group |
||||||||||||||||||||||||||||||||||||||||||||||||||||||||||||||||||||
Point Group Picklist |
Select the Point Group to display and use for Survey Stringwork creation |
|||||||||||||||||||||||||||||||||||||||||||||||||||||||||||||||||||
|
Click to open the Point Group form | |||||||||||||||||||||||||||||||||||||||||||||||||||||||||||||||||||
String Set Table (Survey String Table) |
||||||||||||||||||||||||||||||||||||||||||||||||||||||||||||||||||||
Survey Line Table Picklist |
Select the Survey String Table to apply to the COGO Points and generate Survey Stringwork |
|||||||||||||||||||||||||||||||||||||||||||||||||||||||||||||||||||
|
Click to open the Survey String Settings form | |||||||||||||||||||||||||||||||||||||||||||||||||||||||||||||||||||
Strings |
Lists all the created Survey Strings, listed by Point Code connection |
|||||||||||||||||||||||||||||||||||||||||||||||||||||||||||||||||||
Tick On/Off |
Show/Hide
the Survey String in the Survey Manager form. |
|||||||||||||||||||||||||||||||||||||||||||||||||||||||||||||||||||
Name |
Name
of the Survey String (matching the name of the Point Description
- Code and Survey String Number). Click on the string to highlight for editing Click on the string to display string intersections in the graphical display window Right click after selecting to display the Survey Sting Edit Menu. Note: When a string is selected and all strings are displayed, the zoom will be to the start of the Survey String. |
|||||||||||||||||||||||||||||||||||||||||||||||||||||||||||||||||||
Show Single String |
Click
the button to toggle between showing all Survey Strings and showing
only the highlighted Survey String. Note: When a single Survey String is being displayed, the default zoom will be to show that entire Survey String. |
|||||||||||||||||||||||||||||||||||||||||||||||||||||||||||||||||||
Right Side Panel |
Lists the Points used by the selected Survey String
|
|||||||||||||||||||||||||||||||||||||||||||||||||||||||||||||||||||
List of Point Numbers |
Survey Lines are connected in the COGO Point number order shown. The list will update as edits are made to the order of points for connecting Survey Strings. | |||||||||||||||||||||||||||||||||||||||||||||||||||||||||||||||||||
Up arrow |
Select a Point Number and click this button to move it up in the list. This will change the order of drawing the Survey Stringwork | |||||||||||||||||||||||||||||||||||||||||||||||||||||||||||||||||||
Down arrow |
Select
a Point Number and click this button to move it down in the list. This
will change the order of drawing the Survey Stringwork |
|||||||||||||||||||||||||||||||||||||||||||||||||||||||||||||||||||
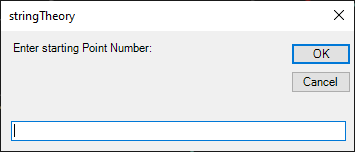
Set Start Point Number |
Click
to display the following form:
COGO Points with the same Description will be edited to have the start number selected, incrementing by 1 for each point along the Survey String. |
|||||||||||||||||||||||||||||||||||||||||||||||||||||||||||||||||||
Graphical Display Area |
Right click Menus
|
|||||||||||||||||||||||||||||||||||||||||||||||||||||||||||||||||||
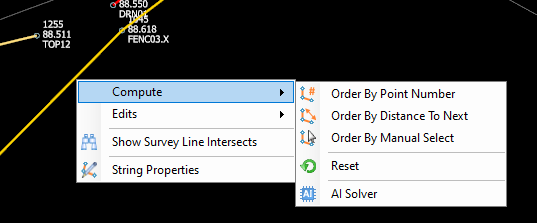
The
following displays after selecting a Survey String in the graphical
display window (or from the Strings list in the left panel) and
pressing the right mouse button: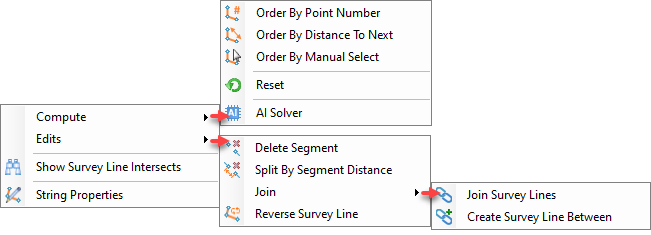 Note: Commands are also displayed on the String Edit Ribbon tab and are detailed below. Commands available by right click only
|
||||||||||||||||||||||||||||||||||||||||||||||||||||||||||||||||||||
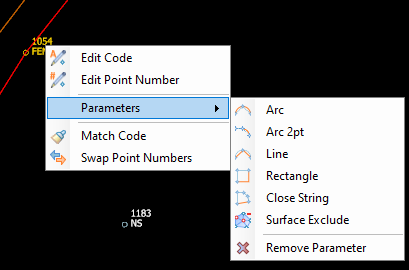
Point Edit Menu |
The
following displays after selecting a COGO Point in the graphical
display window and pressing the right mouse button: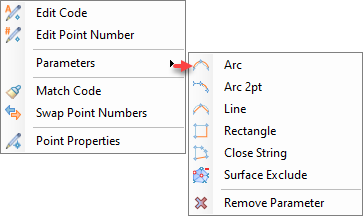 Note: These commands are also displayed on the Point Edit Ribbon tab, and are detailed below. |
|||||||||||||||||||||||||||||||||||||||||||||||||||||||||||||||||||
RIBBON TABS
|
|
|||||||||||||||||||||||||||||||||||||||||||||||||||||||||||||||||||
Home Tab |
Includes core controls for managing the display and general operations |
|||||||||||||||||||||||||||||||||||||||||||||||||||||||||||||||||||
|
If 'Live Output' is unticked, click this button to send changes back to the drawing file | |||||||||||||||||||||||||||||||||||||||||||||||||||||||||||||||||||
Live Output |
If ticked on, changes are saved back to the drawing as survey edits are made. | |||||||||||||||||||||||||||||||||||||||||||||||||||||||||||||||||||
Update Surface |
If ticked on, surface rebuilds as edits are made to COGO Points or Survey Strings | |||||||||||||||||||||||||||||||||||||||||||||||||||||||||||||||||||
Build Surface |
If Update Surface unticked, this command will update the surface to reflech changes made to COGO Points or Survey Strings | |||||||||||||||||||||||||||||||||||||||||||||||||||||||||||||||||||
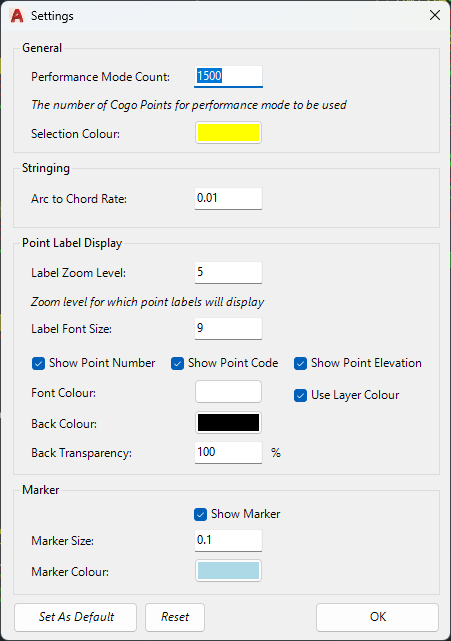
Settings |
Establishes display and performance settings for the Survey Line
Manager. The following form will display:
|
|||||||||||||||||||||||||||||||||||||||||||||||||||||||||||||||||||
Point |
Manages point display controls | |||||||||||||||||||||||||||||||||||||||||||||||||||||||||||||||||||
Point Number |
Toggle display on/off | |||||||||||||||||||||||||||||||||||||||||||||||||||||||||||||||||||
Elevation |
Toggle display on/off | |||||||||||||||||||||||||||||||||||||||||||||||||||||||||||||||||||
Code |
Toggle display on/off | |||||||||||||||||||||||||||||||||||||||||||||||||||||||||||||||||||
Strings |
Manage string display | |||||||||||||||||||||||||||||||||||||||||||||||||||||||||||||||||||
Show Strings |
Toggle string display on/off. Colours as per the Survey Strings Table applied. | |||||||||||||||||||||||||||||||||||||||||||||||||||||||||||||||||||
Thickness |
Select to display Thin, Standard or Thick | |||||||||||||||||||||||||||||||||||||||||||||||||||||||||||||||||||
Surface |
Manager surface display in the form | |||||||||||||||||||||||||||||||||||||||||||||||||||||||||||||||||||
Show Contours |
Toggle to show/hide contours. Contour colours as per Surface Manager | |||||||||||||||||||||||||||||||||||||||||||||||||||||||||||||||||||
Show Triangles |
Toggle to show/hide trianges. Triangle colour as per Surface Manager | |||||||||||||||||||||||||||||||||||||||||||||||||||||||||||||||||||
|
List of
Utility commands.
|
|||||||||||||||||||||||||||||||||||||||||||||||||||||||||||||||||||
|
Click to display crossing Breaklines in the view. The following form will display:
Note: Survey Stringwork may not be a breakline and cross. This will highlight crossing Survey Strings behaving as surface breaklines |
|||||||||||||||||||||||||||||||||||||||||||||||||||||||||||||||||||
|
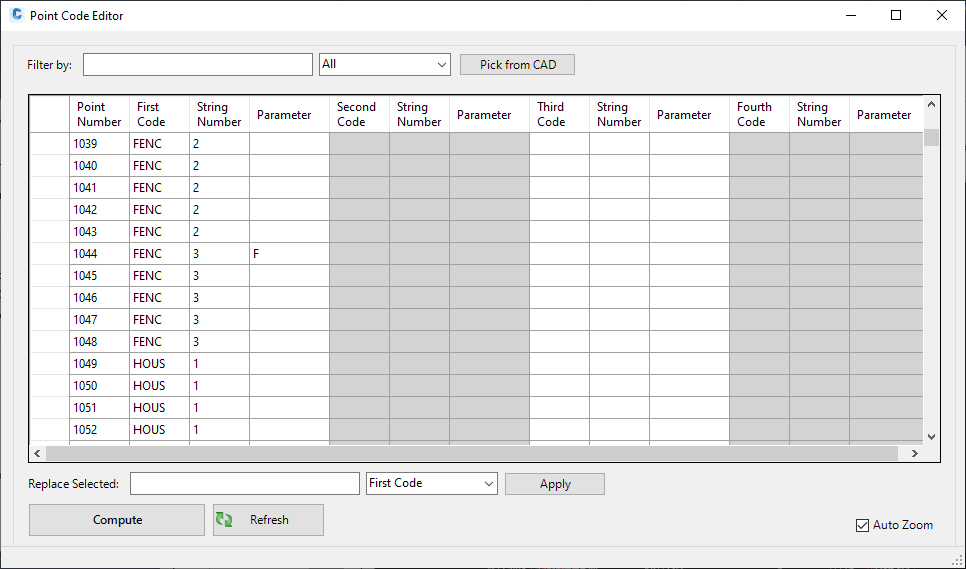
Allows
editing of multiple point codes, including search filtering. The
following form will display:
|
|||||||||||||||||||||||||||||||||||||||||||||||||||||||||||||||||||
|
A confirmation form will display. Clicking OK will delete all Survey Strings for the selected Point Group. Clicking Cancel will exit without deletion. Note: If Create Survey Strings is applied to recreate the Survey Strings, previous edits will be remembered. |
|||||||||||||||||||||||||||||||||||||||||||||||||||||||||||||||||||
Includes String Edit commands (also available by selecting a string and right clicking). Tab displays when a Survey String is selected. |
||||||||||||||||||||||||||||||||||||||||||||||||||||||||||||||||||||
Order Panel |
|
|||||||||||||||||||||||||||||||||||||||||||||||||||||||||||||||||||
|
At
the command line prompt, select a point (any point). |
|||||||||||||||||||||||||||||||||||||||||||||||||||||||||||||||||||
|
At
the command line prompt, select a point. |
|||||||||||||||||||||||||||||||||||||||||||||||||||||||||||||||||||
|
At
the command prompt, select the points in the desired order of
connection. Every point with the same Code needs to be selected. As points are selected, the linework will redraw to show the connections based on the new point connection order. Note: Point Numbers are not changed in this process. The Survey Stringwork instead connects to different COGO Point numbers (not necessarily sequential) |
|||||||||||||||||||||||||||||||||||||||||||||||||||||||||||||||||||
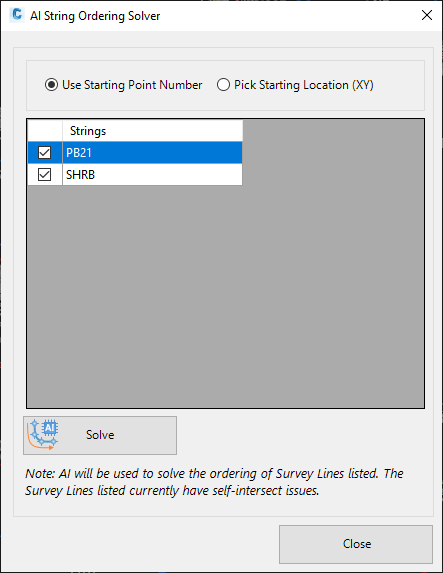
|
The
AI solver will intelligently reconnect the selected Survey String
in order to prevent self-intersects. At the command prompt, select a COGO Point to start the solver |
|||||||||||||||||||||||||||||||||||||||||||||||||||||||||||||||||||
|
This will reverse the point order (direction) for the selected linework. | |||||||||||||||||||||||||||||||||||||||||||||||||||||||||||||||||||
|
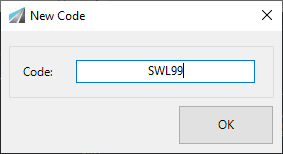
This
command will split a String and place a new String between the selected
COGO point and the next point in the list. The original Code and String number is maintained up to the selected COGO Point. After selecting a split point the following form is displayed: 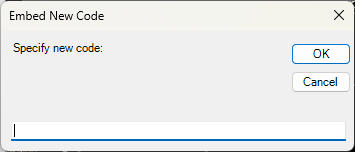 Type in a new Code (String number not required). Dual/Multi Coding will be applied to both the split point and the next point on the original string. The New Code will be assigned a unique String number The next point on the original string, and all subsequent points on that string, will be assigned a unique String number to replace the original String number.. |
|||||||||||||||||||||||||||||||||||||||||||||||||||||||||||||||||||
Edit Panel |
|
|||||||||||||||||||||||||||||||||||||||||||||||||||||||||||||||||||
|
This
command will delete a segment from connected Survey Strings through
a common point code. At the command prompt, select the line segment to remove. The next point/s after the removed segment will have a new Survey Line Number (the Code will remain, however the Survey String number will be incremented). eg: If the original point description was CL1, then all points after the deleted segment will be changed to CL2 (or the next unused Survey String number, if CL2 is already in use) |
|||||||||||||||||||||||||||||||||||||||||||||||||||||||||||||||||||
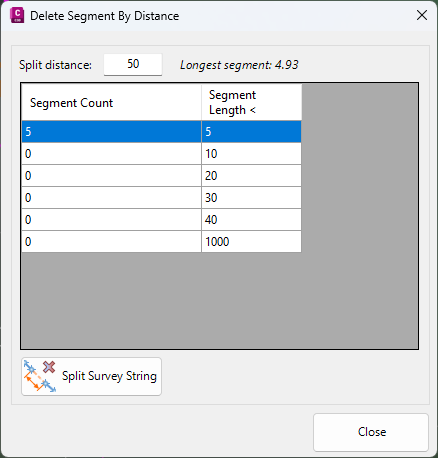
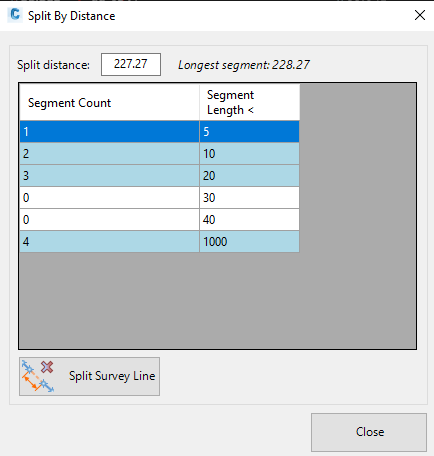
|
This
command will delete segments from connected Survey Strings, where
the distance between points exceeds a user input value. The following form is displayed:
The Survey String is split up, wherever the distance between points is exceeded. After each split, the Point Description is changed by incrementing the Survey String number appended to the Code. |
|||||||||||||||||||||||||||||||||||||||||||||||||||||||||||||||||||
|
Allows a Survey String to be split at a selected point. After clicking on a Point, subsequent point descriptions will be changed to include a unique Survey String Number (using the same Code as the original). The selected Point will be dual coded to include the previous and subsequent Survey String number. Useful when applying Template Parameters to Points. |
|||||||||||||||||||||||||||||||||||||||||||||||||||||||||||||||||||
|
Allows two separate Survey Strings to be joined together. At the prompt, select the String to join. All points on the selected String will be changed to match the Code and String number of the original String, and the survey string recalculated to pass from the end of the first string to the end of the other. Follow the prompt by selecting the other Survey String to connect to. |
|||||||||||||||||||||||||||||||||||||||||||||||||||||||||||||||||||
|
Appends two selected COGO Point Descriptions with a second Code (with Survey String Number), resulting in the creation of a new Survey Line between. This is known as Dual Coding. The second Code is separated from the first by a space. At the prompt, select the Cogo Point to connect to. The following form will display:
|
|||||||||||||||||||||||||||||||||||||||||||||||||||||||||||||||||||
|
Will undo any user reordering of the Survey Strings and reconnect the lines by the order of import of the points (usually point number). | |||||||||||||||||||||||||||||||||||||||||||||||||||||||||||||||||||
|
Click to turn on the display of intersects for all strings in the display window | |||||||||||||||||||||||||||||||||||||||||||||||||||||||||||||||||||
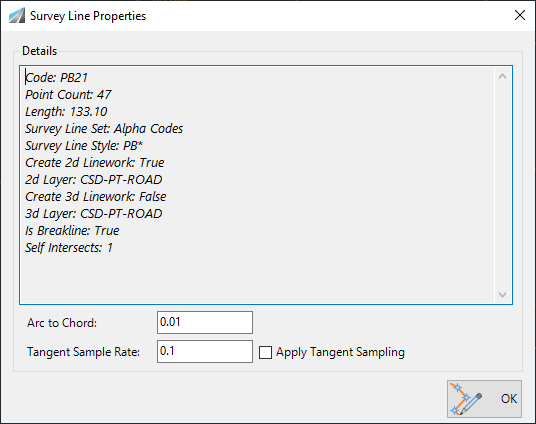
|
Opens the String Properties form:
|
|||||||||||||||||||||||||||||||||||||||||||||||||||||||||||||||||||
Includes Point Edit commands (also available by selecting a point and right clicking) |
||||||||||||||||||||||||||||||||||||||||||||||||||||||||||||||||||||
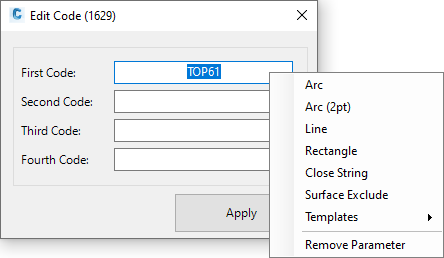
|
Opens a form to change the point code. Note: Right clicking will expose the Code Parameters that can be appended to the Code. Templates can be expanded to list individual parameters that will append offset survey linework (and breaklines) from a Template.
|
|||||||||||||||||||||||||||||||||||||||||||||||||||||||||||||||||||
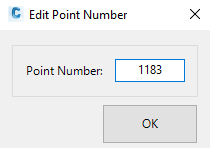
|
Opens a form to change the point number:
|
|||||||||||||||||||||||||||||||||||||||||||||||||||||||||||||||||||
|
Follow
the command prompts. Select a source COGO Point and
then a second COGO Point. |
|||||||||||||||||||||||||||||||||||||||||||||||||||||||||||||||||||
|
Follow
the command prompts. Click a source COGO Point and
then a second COGO Point. |
|||||||||||||||||||||||||||||||||||||||||||||||||||||||||||||||||||
|
Select
a COGO Point to apply muli coding to (append the Code from another COGO
point). At the command prompt select a COGO point to join to. The Code of the COGO Point selected will be appended to the current Code (multi coding the original point selected) |
|||||||||||||||||||||||||||||||||||||||||||||||||||||||||||||||||||
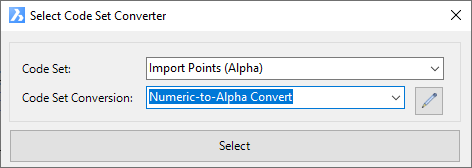
|
Select
a COGO Point to apply. |
|||||||||||||||||||||||||||||||||||||||||||||||||||||||||||||||||||
|
Select
a COGO Point to apply. |
|||||||||||||||||||||||||||||||||||||||||||||||||||||||||||||||||||
|
Select
a COGO Point to apply. |
|||||||||||||||||||||||||||||||||||||||||||||||||||||||||||||||||||
|
Select
a COGO Point to apply. |
|||||||||||||||||||||||||||||||||||||||||||||||||||||||||||||||||||
|
Select
a COGO Point to apply. |
|||||||||||||||||||||||||||||||||||||||||||||||||||||||||||||||||||
|
Select
a Template to apply to the Code. |
|||||||||||||||||||||||||||||||||||||||||||||||||||||||||||||||||||
|
Select
a COGO Point to apply. |
|||||||||||||||||||||||||||||||||||||||||||||||||||||||||||||||||||
|
Select
a COGO Point to apply. |
|||||||||||||||||||||||||||||||||||||||||||||||||||||||||||||||||||