Sequence Network
| Icon: |
|
| Menu: | Pipes > Sequence Network |
| Ribbon: | Pipes Tab > Network Panel > Sequence Network |
Introduction
This command is used to set/update the sequence of the branches of a defined network.
The branch sequence should be set prior to running the following commands:
Details
Upon selecting this command, the designer must select a network to sequence. This can be achieved by either selecting the network in the drawing or from a list. Click here for more details on selecting a network.
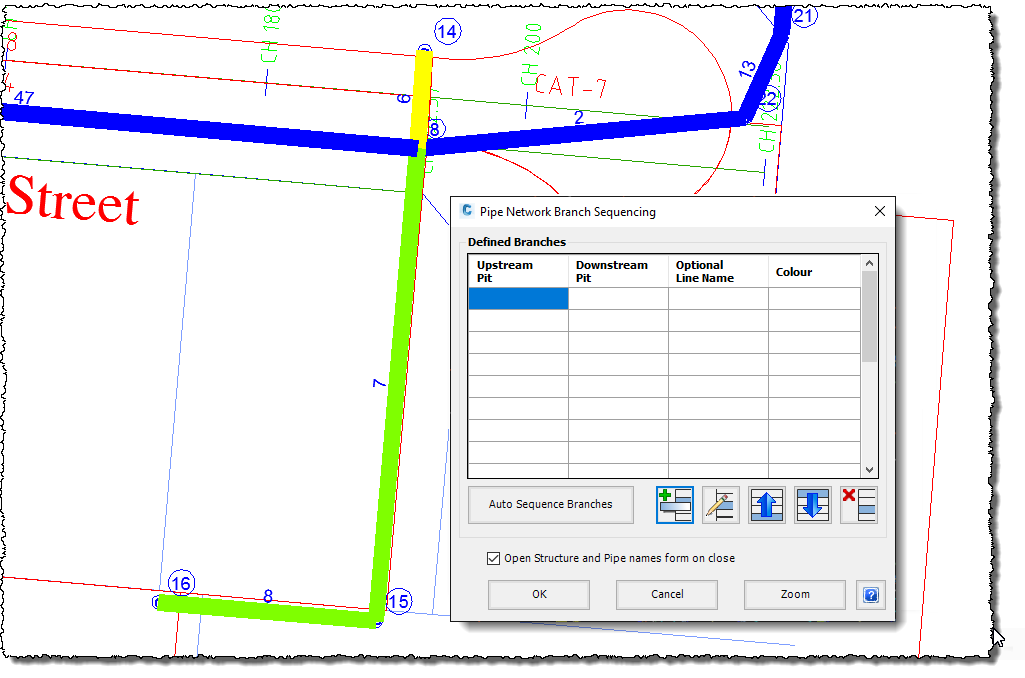
After selecting a network, the following form is displayed:
 |
|||||||||
| Defined Branches | This lists the branches that have been defined for the current pipe network. The current branch is highlighted blue. | ||||||||
| List of Branches | Each defined branch is listed and includes:
|
||||||||
| Auto Sequence Branches | Automatically sequences the entire network. It is recommended that the primary branch be defined before using this function to add the additional branches. | ||||||||
 Add Branch Add Branch |
Adds a new branch. See Add Branch below for more details. | ||||||||
 Edit Branch Edit Branch |
Edits the current branch. See Edit Branch for more details. | ||||||||
 Move Branch Up Move Branch Up |
Move the current branch up. | ||||||||
 Move Branch Down Move Branch Down |
Move the current branch down. | ||||||||
 Delete Branch Delete Branch |
Delete the current branch. | ||||||||
| Open Structure and Pipe names form on close | Tick on to open the Apply Object Names command upon close of this form. Ticked on by default. | ||||||||
| OK | Apply and exit. | ||||||||
| Cancel | Exit the form. | ||||||||
| Zoom | Allows the user to zoom and pan the drawing. After selecting this button, the user will be asked to "Use Mouse Wheel to Zoom/Pan. Press enter/Esc to Finish". Adjust the zoom and/or pan in the drawing and press enter or escape to return to the form. | ||||||||
Add Branch
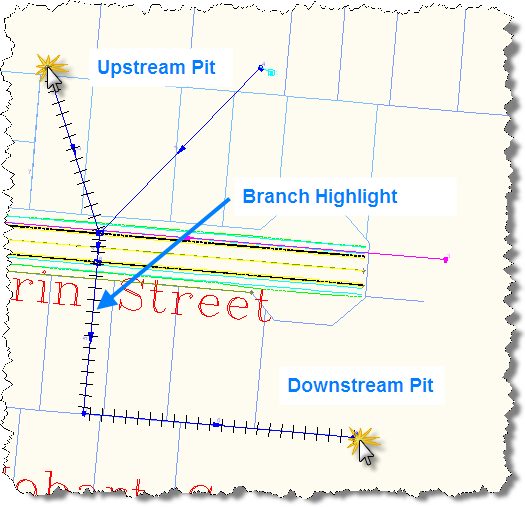
Upon selecting this function, at the Command prompt the user will be asked to "Locate Upstream Structure Required". Select the upstream structure of the branch required.
The software will highlight the branch all the way to the outlet of the pipe network as shown below. Select the downstream structure required.
Note: It is recommended that the outlet always be chosen as the downstream structure. When the pipe network is plotted, the duplicated sections of the branches will not be plotted.
The branch details will be added to the form, identified by the upstream and downstream structure numbers and given a highlighted colour while in the Branch Sequencing form.
Edit Branch
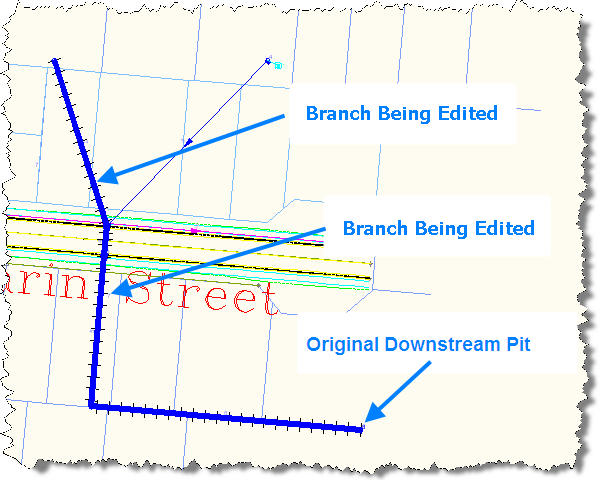
Upon selecting this function, at the Command prompt the user will be asked to "Locate Downstream Structure Required".
The sequenced branches will be coloured and the branch being edited will also be highlighted.
Select the new downstream structure of the branch.
Optional Line Name
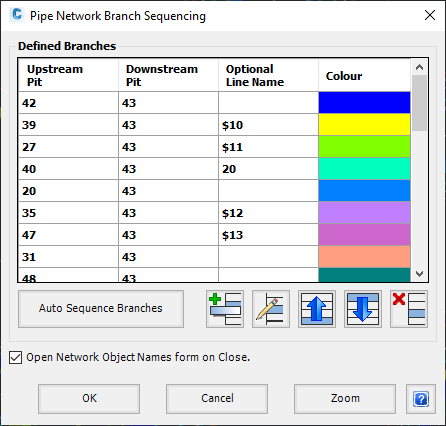
For alpha line names (ie. A, B, C...) the user must specify the Optional Line Name for each Line/Branch. For numeric line names (ie. 1, 2, 3...) the user can specify the Optional Line Name for each Line/branch uniquely or precede the number with a $.
How the software assigns the name
The software looks at all the entries in the Optional Line Name for each line/branch listed and assess entry looking at the list from the top down. All blank entries will be assigned names as part of the automatic numbering starting from 1 until it encounters the first entry starting with a $. This line/branch will be labelled with the specified number and all following blank entries will sequenced from this number (any line with a preceding $ will be treated as a blank). If the software encounters an entry with a defined name (no preceding $), the this name will be used and the user must enter the next entry using a preceding $ and number to continue the sequence otherwise the blank entries following will be assigned the name based on the automatic line numbers (ie. fourth line/branch in list will be named 4).
An example of the Option Line Numbering and the resulting Line/Branch names is illustrated below:
 |
= | Resulting Line/Branch Name |
| 1 | ||
| 10 | ||
| 11 | ||
| 20 | ||
| 5 | ||
| 12 | ||
| 13 | ||
| 14 | ||
| 15 | ||