|

|
|
Object Groups |
This is where object groups are listed for editing, and
includes options to create and delete extrusions |
|
[List of Extrusion
Groups] |
Click on a named Extrusion Group to edit on the right |
|
Add Group |
Create a new Extrusion Group. Edit using the Details
on the right |
|
Delete Group |
Delete a selected Extrusion Group. |
|
Group |
The setup and definition of the object group. |
|
Name |
Name the Object Group |
|
Setup
Position |
This opens the
Positioning
Form, which is used extensively in Model Viewer to
establish object positions.
Details on
the inputs are as noted in the
Positioning
Form help link. |
|
Objects |
This establishes the group of objects to add |
|
Add |
Use the picklist for a method of adding objects, then click
on the  Add button. Add options include:
 |
|
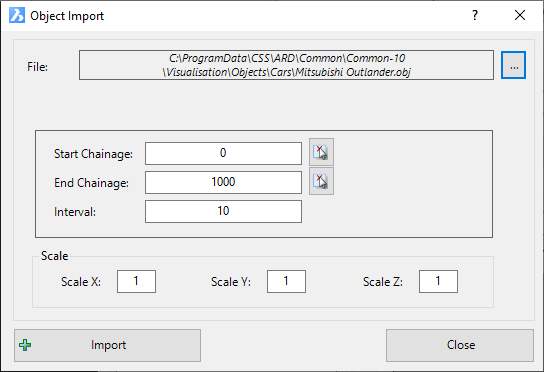
By
chainage range at interval |
|
User specified distance between
objects along the alignment/string.
 |
|
File Selection (...) |
Click to select the object to import. The following
form will display:
|
 |
|
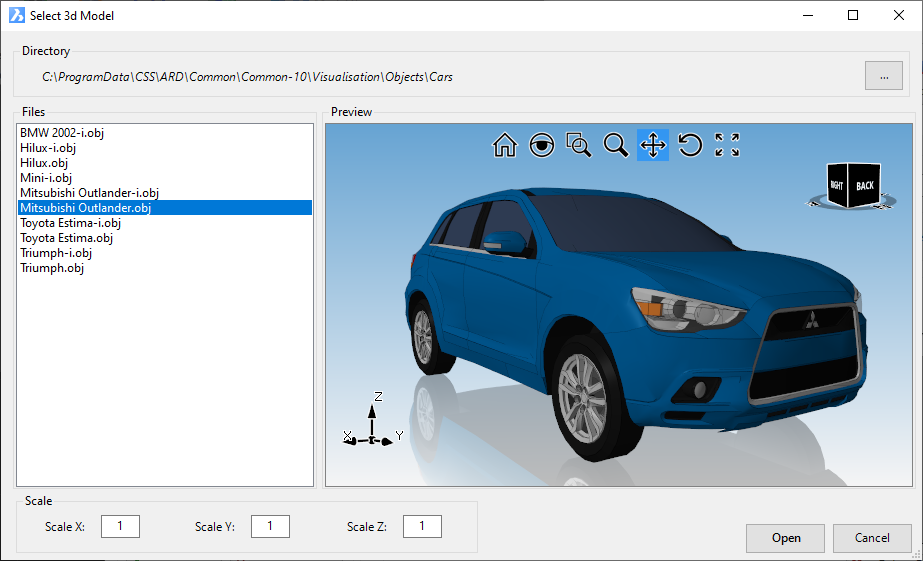
Directory (...) |
Click here to select the directory to open containing
objects |
|
Files |
Select an object from the current folder |
|
Preview |
Displays a 3D view of the selected object |
|
Scale |
|
|
Scale X |
Set the X scale of the object |
|
Scale Y |
Set the Y scale of the object |
|
Scale Z |
Set the Z scale of the object |
|
Open |
Select the object for import |
|
Cancel |
Return to the previous form |
|
|
Start Chainage |
Type in the chainage for the start of the object creation.
Use the pick button to select from the drawing |
|
End Chainage |
Type in the chainage for the end of the object creation.
Use the pick button to select from the drawing |
|
Interval |
Type in the distance between objects |
|
Scale |
|
|
Scale X |
Set the X scale of the object |
|
Scale Y |
Set the Y scale of the object |
|
Scale Z |
Set the Z scale of the object |
|
|
|
|
Image Preview |
A .obj file is usually accompanied by a folder with the same
name as the .obj. This file will contain images used by the
.obj. This preview window will display these images
for a quick identification (thumbnail) of the object. |
|
  |
Click on the arrows to cycle
through images, where more than one is available |
|
|
|
|
Import |
The objects are added to the
Object Group list, listed by chainage along the alignment. |
|
|
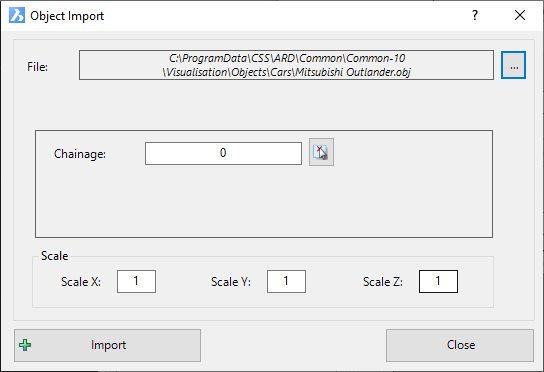
Single Chainage |
|
Single object insertion along
the alignment/string.
 |
|
File Selection (...) |
Click to select the object to import. The following
form will display:
|
 |
|
Directory (...) |
Click here to select the directory to open containing
objects |
|
Files |
Select an object from the current folder |
|
Preview |
Displays a 3D view of the selected object |
|
Scale |
|
|
Scale X |
Set the X scale of the object |
|
Scale Y |
Set the Y scale of the object |
|
Scale Z |
Set the Z scale of the object |
|
Open |
Select the object for import |
|
Cancel |
Return to the previous form |
|
|
Chainage |
Type in the chainage for the object insertion. Use the
pick button to select from the drawing |
|
End Chainage |
Type in the chainage for the end of the object creation.
Use the pick button to select from the drawing |
|
Interval |
Type in the distance between objects |
|
Scale |
|
|
Scale X |
Set the X scale of the object |
|
Scale Y |
Set the Y scale of the object |
|
Scale Z |
Set the Z scale of the object |
|
|
|
|
Image Preview |
A .obj file is usually accompanied by a folder with the same
name as the .obj. This file will contain images used by the
.obj. This preview window will display these images
for a quick identification (thumbnail) of the object. |
|
  |
Click on the arrows to cycle
through images, where more than one is available |
|
|
|
|
Import |
The objects are added to the
Object Group list, listed by chainage along the alignment. |
|
|
Sections |
|
This uses all the sampling from
the selected string.
 |
|
File Selection (...) |
Click to select the object to import. The following
form will display:
|
 |
|
Directory (...) |
Click here to select the directory to open containing
objects |
|
Files |
Select an object from the current folder |
|
Preview |
Displays a 3D view of the selected object |
|
Scale |
|
|
Scale X |
Set the X scale of the object |
|
Scale Y |
Set the Y scale of the object |
|
Scale Z |
Set the Z scale of the object |
|
Open |
Select the object for import |
|
Cancel |
Return to the previous form |
|
|
Chainage |
Type in the chainage for the object insertion. Use the
pick button to select from the drawing |
|
End Chainage |
Type in the chainage for the end of the object creation.
Use the pick button to select from the drawing |
|
Interval |
This field is not used. The sampling
along the string will be used for object locations. |
|
Scale |
|
|
Scale X |
Set the X scale of the object |
|
Scale Y |
Set the Y scale of the object |
|
Scale Z |
Set the Z scale of the object |
|
|
|
|
Image Preview |
A .obj file is usually accompanied by a folder with the same
name as the .obj. This file will contain images used by the
.obj. This preview window will display these images
for a quick identification (thumbnail) of the object. |
|
  |
Click on the arrows to cycle
through images, where more than one is available |
|
|
|
|
Import |
The objects are added to the
Object Group list, listed by chainage along the alignment. |
|
|
[List of
added Objects] |
This lists each object added to the group. The objects
are defined with the following controls:
|
Chainage |
This is measured along the alignment/sring defined in the
Set Position form. |
|
Scale |
Type in a scaling for each object (default is 1) |
|
Path |
The path to the object. Use the ... button to change
the .obj applied for any item in the list |
|
|
Explode
Group |
Converts the object group into individual objects, which are
then managed via the
Import Objects
and object Edits commands.
Note: There is no undo for this action |
|
Delete
Object |
Deletes a selected object from the group.
Note: Select the object by clicking on the
cell in the first column. This highlights the whole
object entry, selecting it for deletion. Otherwise the
item will not be deleted |
|
Delete
All Objects |
Click to remove all objects from the list. |
|
Close |
Exit the form without deleting any data. |
![]()


