Pipe Items
Introduction
This command controls the information about Pipes that is to be included on the long section.
The information is entered via a multi-tabbed form.
Details
The Pipe Items form is broken up into several main tabs controlling different aspects of the display: (Click on a tab for more information about that tab):
 |
|
| OK | Apply and add Data Band Control to list and exit. |
| Cancel | Exit the form without adding any data. |
Upon selecting the Pipe Items button from the Data Bands/Controls form the following form is displayed:
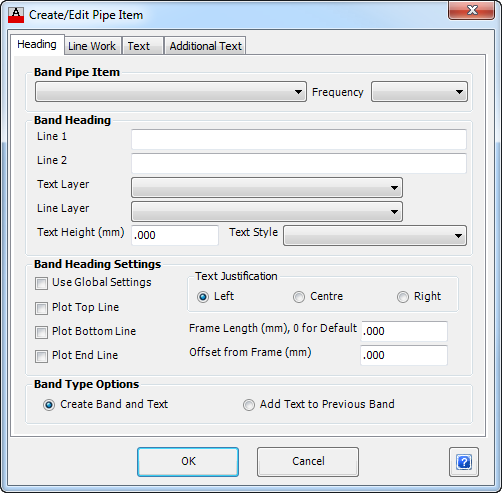
Heading Tab
Controls the Heading that appears outside and on the left hand edge of the Long Section.
 |
|
| Band Pipe Item | Main area to indicate what Band Pipe Item is to be displayed and for what Frequency (if applicable). |
| Band Structure Item - Pick List | From the drop down list, select the item that is to be displayed for this row/band. Click here for a list of reportable items. It is strongly recommended that a reportable/plottable item be selected that is relevant to display at a structure, otherwise the textual display may be blank or otherwise not as expected. The list will initially display all available Reportable/Plottable Items. At the top of the list of items are CATEGORIES, allowing the user to filter the list based on the category. Users can pick a category in the list - when they re-select the list the reportable items will be filtered based on the selected Category. Note: The assignment of Reportable Items to different Categories is controlled by the Categorise Items command. |
| Frequency | If applicable, select the Frequency for the Band Item. Note: This is relevant for reportable/plottable items of a drainage network, where the values are dependant on the storm frequency. |
| Heading | Controls the Heading to be displayed on the Left Hand side of the long section for the row/band. |
| Line 1 | Enter the first line of the heading in the box provided. |
| Line 2 | Enter the second line of the heading in the box provided. |
| Text Layer | From the drop down list select the required layer for the Heading (Line 1, Line 2) Text. Use the Layer Settings command to edit the layers available. |
| Line Layer | From the drop down list select the required layer for the Heading (Border) Line work. Use the Layer Settings command to edit the layers available. |
| Text Height (mm) | Enter the size of the Heading Text in millimetres. |
| Text Style | From the drop down list select the required text style for the Heading. |
| Heading Settings | Settings to control various heading items. |
| Use Global Settings | Select this option to use any Global Settings defined - this toggle is enabled if the user has added Heading Controls. If this option is toggled on, none of the other heading settings are used. |
| Plot Top Line | Select this to draw the Top Line of the Heading Box. |
| Plot Bottom Line | Select this to draw the Bottom Line of the Heading Box. |
| Plot End Line | Select this to draw the End (Left edge) Line of the Heading Box. |
| Text Justification | Select the justification (Left, Centre or right) of the Heading Text. |
| Frame Length (mm) | Enter the required Frame Length in plotted millimetres in the box provided. If no value is entered (or zero is entered) the width will be adjusted based on the text string length. |
| Offset Frame (mm) | Enter an optional offset in millimetres to offset the text from the position set in the Text Justification |
| Band Type Options | Choose whether to create a new band or add the textual information to an existing band. |
| Create Band & Text | Select this option to create a Separate Row/Band. The text created will occupy a row in the top/bottom area and include a Heading. |
| Add Text to Previous Band | Select this option to add this information to the Previous Band - this is the band/row data immediately above the current band/row being created/edited. Note: If this is ticked on, the Heading controls are not required and are hidden. |
Linework Tab
Controls the Linework that appears for the Row/Band.
 |
|
| Band Linework Controls | Provides controls for the linework of a band. |
| Line Layer | From the drop down list select the required layer for the Row Line work. Use the Layer Settings command to edit the layers available. |
| Band Position | From the drop down list the position for this band, either Top (above the view frame) or Bottom (below the view frame) |
| Band Height (mm) | Enter the Band Height in plotted millimetres in the box provided. |
| Middle Line Height (mm) | Enter the height (or position) of the Middle Line within the Band Height in millimetres in the box provided. This value is used if the Middle Line is plotted and/or arrow heads are shown on the middle line |
| Draw | Place a Tick against which lines (Top, Middle, Bottom, Vertical) should be plotted for this band. Untick the boxes for which lines that are NOT to be plotted. |
| Band Arrow Head Options | Provides control on arrows that can be plotted on bands. |
| Arrow Head Block | From the drop down list, select the arrow head block to be used on the linework. The blocks are initially loaded from the CSD common folder and then from the drawing. Note: This control can be used in a variety of ways, including the presentation of a circle (block) around structure names. |
| Show Arrow Head on: | Place a Tick against the position (Top, Middle, Bottom) an arrow should be plotted for this band. Untick the boxes for which arrow (block) positions should NOT be plotted. |
Text Tab
Controls the display of Text used for the band. The properties (values) of the Text are controlled from the Heading tab.
 |
|||||||||
| Text Options | Provide controls of textural information to be displayed within the band of the Long Section. | ||||||||
| Text Layer | From the drop down list select the required layer for the band text. Use the Layer Settings command to edit the layers available. | ||||||||
| Text Style | From the drop down list select the required style for the band Text. | ||||||||
| Text Height (mm) | Enter the size of the band Text in millimetres | ||||||||
| No. of Decimal Places | From the drop down list select the number of Decimal places to display for the band, either 0, 1, 2 or 3. This control is applied to numerical data items only. | ||||||||
| Text Plot Position (Image Button) | Select this button to control the insert location for the text item. A separate form will be displayed showing graphically the text insert position, as shown:
|
||||||||
| Vertical Distance from Horizontal Line | In the box provided enter an offset for the text to displaced vertically from the selected text insertion position. | ||||||||
| Horizontal Distance from Vertical Line | In the box provided enter an offset for the text to displaced horizontally from the selected text insertion position. | ||||||||
| Prefix | Enter an optional Prefix to be added to all Text items in the band in the box provided. Note: Use an _ (underscore) as the first or last character to represent a space - the _ (underscore) is replaced with a space in the output. | ||||||||
| Suffix | Enter an optional Suffix to be added to all Text items in the band in the box provided. Note: Use an _ (underscore) as the first or last character to represent a space - the _ (underscore) is replaced with a space in the output. | ||||||||
| Remove Duplicates | Tick this box to Remove Duplicates of Text Items. Duplicated pipe information will be removed. | ||||||||

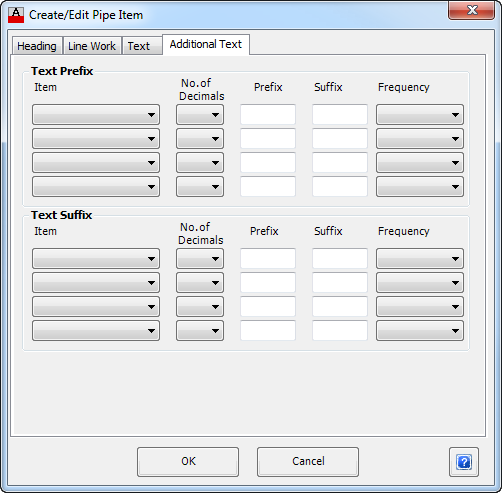
Additional Text
Allows the user to append extra text to the pipe text. This is particularly useful for showing multiple text items such as Pipe Class, diameter and slope all on one line.
 |
|
| Text Prefix | Select up to four (4) different items to be added as a Prefix to the Band Text. |
| Item | From the drop down list, select an item that is to be included as a prefix to the data text. Click here for a list of reportable items. |
| No. of Decimal Places | From the drop down list select the number of Decimal places to display for the item, either 0, 1, 2 or 3, if applicable. |
| Prefix | Enter an optional Prefix to be added to the item in the box provided. Note: Use an _ (underscore) as the first or last character to represent a space - the _ (underscore) is replaced with a space in the output. |
| Suffix | Enter an optional Suffix to be added to the item in the box provided. Note: Use an _ (underscore) as the first or last character to represent a space - the _ (underscore) is replaced with a space in the output. |
| Frequency | If applicable, select the Frequency for the Band Item. Note: This is relevant for reportable/plottable items of a drainage network, where the values are dependant on the storm frequency. |
| Text Suffix | Refer Text Prefix (above) for description of items. The items listed are the same as for the prefix except will be added as a suffix. |