Label Network (legacy)
| Icon: |
|
| Menu: | Pipes > Legacy Labels > Labels (Legacy) > Label Network |
| Ribbon: | Pipes Tab > Plan Production Panel Flyout > Label Network (legacy) |
Introduction
Note: This is now considered a legacy command. The command Network Labels has been developed to replace this command with enhanced controls over text sizes, content details, text offsets and positions.
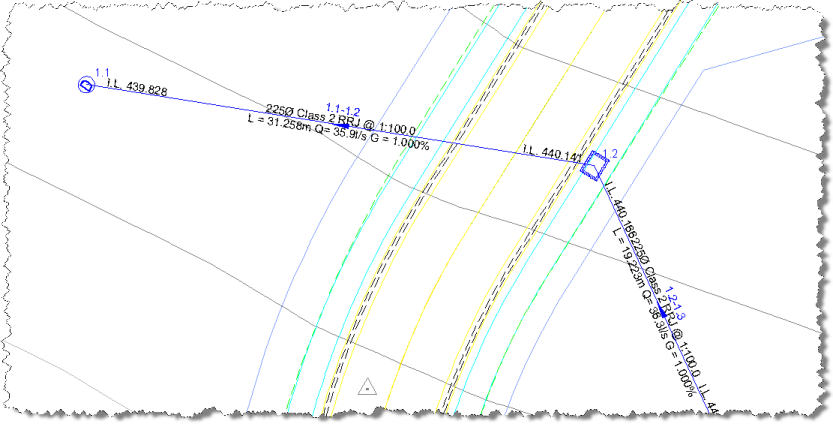
This command is used to add labels on a defined Pipe Network in model space. The user can select what information is displayed.
Note: This command will only work on a defined Pipe Network.
Details
Upon selecting this command, the designer must select a network to sequence. This can be achieved by either selecting the network in the drawing or from a list. Click here for more details on selecting a network.
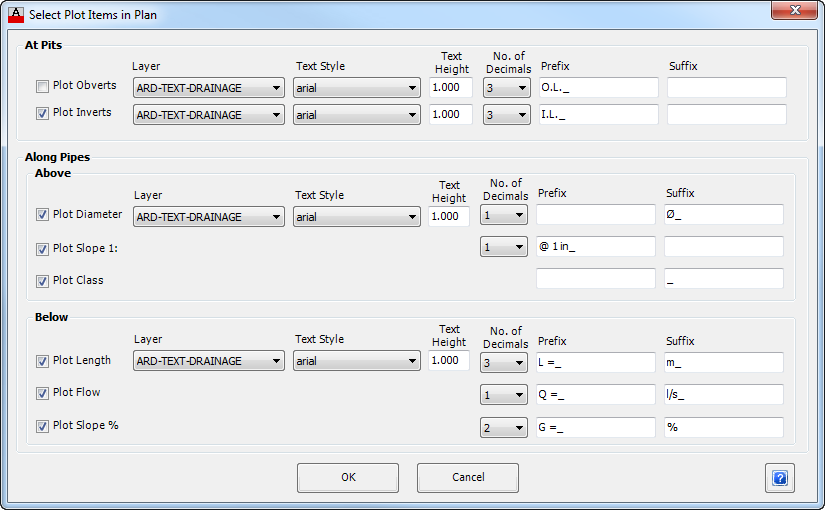
After selecting a network the following form is displayed:
|
|
| At Structures | Define the items to be plotted at structures. Both the upstream and downstream end of the pipe will be labelled. The Invert is plotted above the pipe and the Obvert is below. The Layer/Text Settings is described below. |
| Plot Obverts | Check to label the pipe obverts. |
| Plot Inverts | Check to label the pipe inverts. |
| Along Pipes | Define the items to be plotted along pipes. |
| Above | Define the items to be plotted above the pipes. The order is Diameter, Class and Slope. The Layer/Text Settings is described below. |
| Plot Diameter | Check to label the pipe diameter. |
| Plot Slope 1: | Check to add the Slope of the pipe. |
| Plot Class | Check to add the Class of the pipe. |
| Below | Define the items to be plotted below the pipes. The order is Length, Flow and Grade. The Layer/Text Settings are described below. |
| Plot Length | Check to label the pipe length. |
| Plot Flow | Check to add the Flow of the pipe. Values are reported in L/s. |
| Plot Slope % | Check to add the Slope of the pipe as a percentage. |
| Layer/Text Settings | The various items can be based on these settings. Some settings are for the whole component. |
| Layer | From the drop down list, select the layer that will be applied to the appropriate label item. |
| Text Style | From the drop down list, select the font that will be applied to the appropriate label item. |
| Text Height | Enter the text height in drawing units. |
| No. Of Decimals | Select the number of decimals places that will be applied to the appropriate label item. |
| Prefix | Select the prefix that will be applied to the appropriate label item. Note: Use an _ (underscore) as the first or last character to represent a space - when the label is created the _ (underscore) is replaced with a space. |
| Suffix | Select the suffix that will be applied to the appropriate label item. Note: Use an _ (underscore) as the first or last character to represent a space - when the label is created the _ (underscore) is replaced with a space. |
| OK | Apply and exit. |
| Cancel | Exit the form without deleting any data. |
Note: Output text is automatically flipped to be plan readable.