Open Cross Section
Icon: ![]()
![]()
Menu: Roads > Select/Open/Edit > Open Cross Section Window
Ribbon: Roads Tab > Select Panel > Open Cross Section
Introduction
Civil Site Design supports the opening of multiple cross section windows for any road, string or other CSD object.
This command allows the designer to open a new cross section window for any selected CSD object. This window will display the cross section design at the user nominated chainage for the selected CSD object.
The Cross Section Window is also accessible from the Vertical Grading Editor Window and the Design Data Form.
After starting the command, the designer needs to select the CSD object (eg: Road) and the chainage to display.
In the display window of the cross section, designers can use the middle mouse button to zoom and pan.
Cross section windows are also able to be opened from a Vertical Grading Editor Window - in this case the chainage of the cross section window can be set to react to a right mouse button click in the Vertical Grading Editor Window. Users hover the mouse pointer near a sampled chainage in the Vertical Grading Editor window and click on the right mouse button to view that cross section in the Cross Section Window.
Pre-Setting the Cross Section Window Display
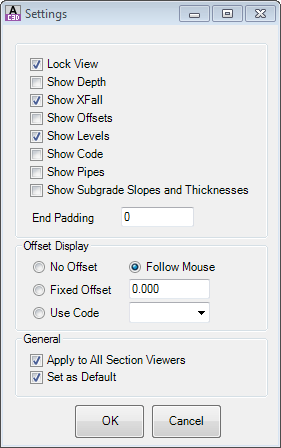
Users are able to configure the information displayed in the Cross Section Window, including the inclusion of objects in the view such as other Strings/Profiles, Alignments, CSD Pipes and selected AutoCAD objects. Whilst this can typically be configured on each cross section window displayed, defaults can also be set for cross section windows when they are opened via the following CSD commands:
 Cross Section Window Defaults - this sets the default textual information to display in the cross section window as well as other controls
 Cross Section Window Object Display - this sets any objects to show on the cross section by default (eg: show alignments, strings, etc)
Marker Display in the Drawing
The active cross section is highlighted with a marker in the drawing. This marker is managed via a block in the Civil Site Design Settings (CSD Settings) folder. Users are able to replace this drawing block as desired. The CSD Settings folder can be opened in Windows Explorer via the Open Settings Folder command in the General menu/ribbon. The block is named XSECTACTIVE.dwg.
As the mouse if moved across a cross section window, a line will track the mouse location, displaying perpendicular to the section in the drawing.
Details
After starting the command, select an CSD Object (by clicking on/near the alignment) and then click on the nearest chainage. The following form will be displayed:
 |
|||||||||||||||||||||||||||||||||||||||||
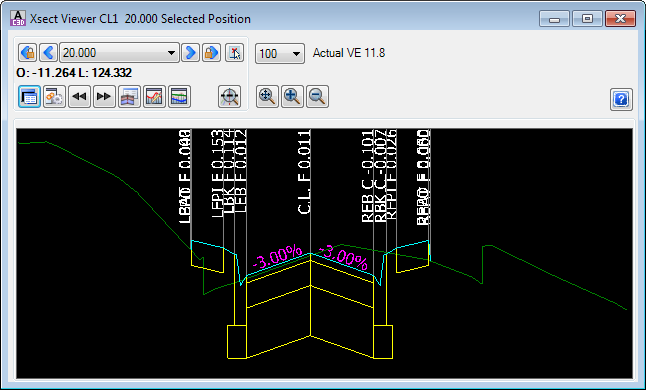
| Display Window | The display window graphically shows the cross section. Users can use the middle mouse button to zoom (scroll) and pan (hold down) the display. | ||||||||||||||||||||||||||||||||||||||||
| Change all open cross section windows to display the previous sampled cross section chainage. | |||||||||||||||||||||||||||||||||||||||||
| Change the cross section window to show the previous sampled cross section chainage. | |||||||||||||||||||||||||||||||||||||||||
| Chainage | Pick box allowing the user to toggle to the sampled chainage to display. After clicking in the box with the left mouse button, the up and down buttons on the keyboard can be used to cycle through the cross sections | ||||||||||||||||||||||||||||||||||||||||
| Change the cross section window to show the next sampled cross section chainage. | |||||||||||||||||||||||||||||||||||||||||
| Change all open cross section windows to display the next sampled cross section chainage. | |||||||||||||||||||||||||||||||||||||||||
| Pick a cross section from the drawing to display | |||||||||||||||||||||||||||||||||||||||||
| Vertical Exaggeration | Pick list to select the desired vertical exaggeration. | ||||||||||||||||||||||||||||||||||||||||
| Actual VE | Displays the actual vertical exaggeration being applied to the cross section window. | ||||||||||||||||||||||||||||||||||||||||
| Offset/Level | Prefixed by O: for offset and L: for level, the numbers represent the exact location of the mouse pointer inside the cross section display window. | ||||||||||||||||||||||||||||||||||||||||
This command enables user control over what is displayed in the cross section window. Upon selecting this command the following form is displayed:
|
|||||||||||||||||||||||||||||||||||||||||
| This command enables additional objects/data to be displayed on the cross section windows. The form layout and details are described in the |
|||||||||||||||||||||||||||||||||||||||||
| Runs through the cross sections, from the current chainage to the end of the String | |||||||||||||||||||||||||||||||||||||||||
| Runs through the cross sections, from the current chainage to the start of the String | |||||||||||||||||||||||||||||||||||||||||
| Opens the |
|||||||||||||||||||||||||||||||||||||||||
| Opens the |
|||||||||||||||||||||||||||||||||||||||||
| Opens the Vertical Grading Editor window for every String that is associated to the current String (by way of Varation). | |||||||||||||||||||||||||||||||||||||||||
| Zooms to the section location in the drawing. | |||||||||||||||||||||||||||||||||||||||||
| Zooms to the full extents of the cross section | |||||||||||||||||||||||||||||||||||||||||
| Zooms in by 25% Note: Scrolling using the middle mouse button enables zoom Hold down the middle mouse button to pan |
|||||||||||||||||||||||||||||||||||||||||
| Zooms out by 25% Note: Scrolling using the middle mouse button enables zoom Hold down the middle mouse button to pan |
|||||||||||||||||||||||||||||||||||||||||
| Max Exaggeration | Use the pick box to select the maximum vertical exaggeration to be applied in the cross section window. | ||||||||||||||||||||||||||||||||||||||||