Create Video
Introduction
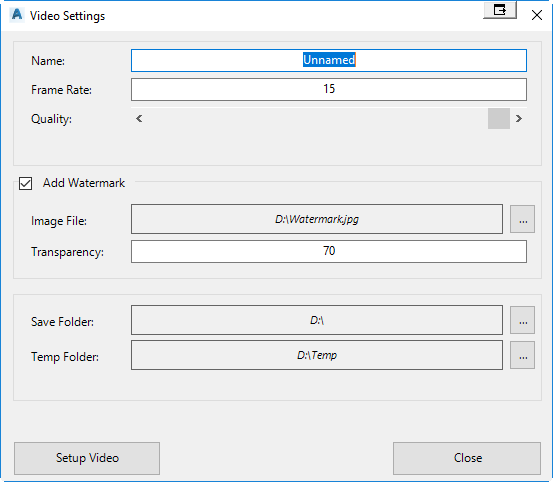
Using Model Viewer, users can output an AVI file using either the Record Video command or the Drive command. When specifying the video output settings, the Create Video dialog will be displayed. This dialog allows users to specify the name of the video, frame rate, quality, and the location the AVI file is stored.
Details
Upon selecting the command the following form is displayed:
|
|
|
|
|
|
|
Name |
Specify the filename of the AVI. |
| Frame Rate | Specify the video frame rate. The higher this value, the faster the speed the video will play. |
| Quality | Use the slider to set the quality of the video. The lower the quality, the smaller the saved file size is. |
|
Add Watermark |
Toggle on/off the adding of a watermark, which will be displayed in the bottom right corner of the video |
| Image file | Specify the location of the watermark image |
| Transparency | Set the transparency value of the watermark image |
| Save Folder | The location the AVI file is stored to. |
| Temp Folder | The software will create bitmap files for each frame before generating the AVI file. These bitmap files are used to generate the AVI and will be deleted once the AVI is created. It is recommended that this folder contains plenty of free disk space. |
|
Setup Video |
The software will proceed to process the video. A confirmation message box will display once the video file has been created. |
|
Close |
Exit the form. |
Note: If you would like to convert the video to another format or compress the video, than it recommend that you use "Handbrake". Handbrake is a free program that can be downloaded here.